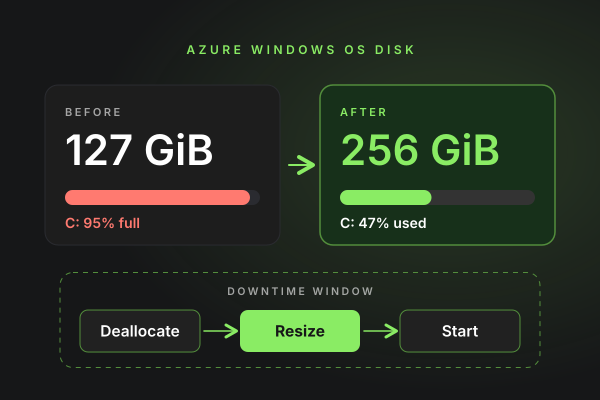
Your C: drive is at 95% and the server is in production. The first search result promises you can grow the disk with no downtime. For an OS disk, that is not true. Azure can expand data disks live, but an OS disk still needs the VM deallocated. This guide shows how to extend an Azure Windows OS disk with the shortest possible outage, and how to stop it happening again.
Key Takeaways
- Azure supports expanding disks without downtime "only for data disks." To extend an Azure Windows OS disk, you must deallocate the VM (Microsoft Learn, Sep 2026).
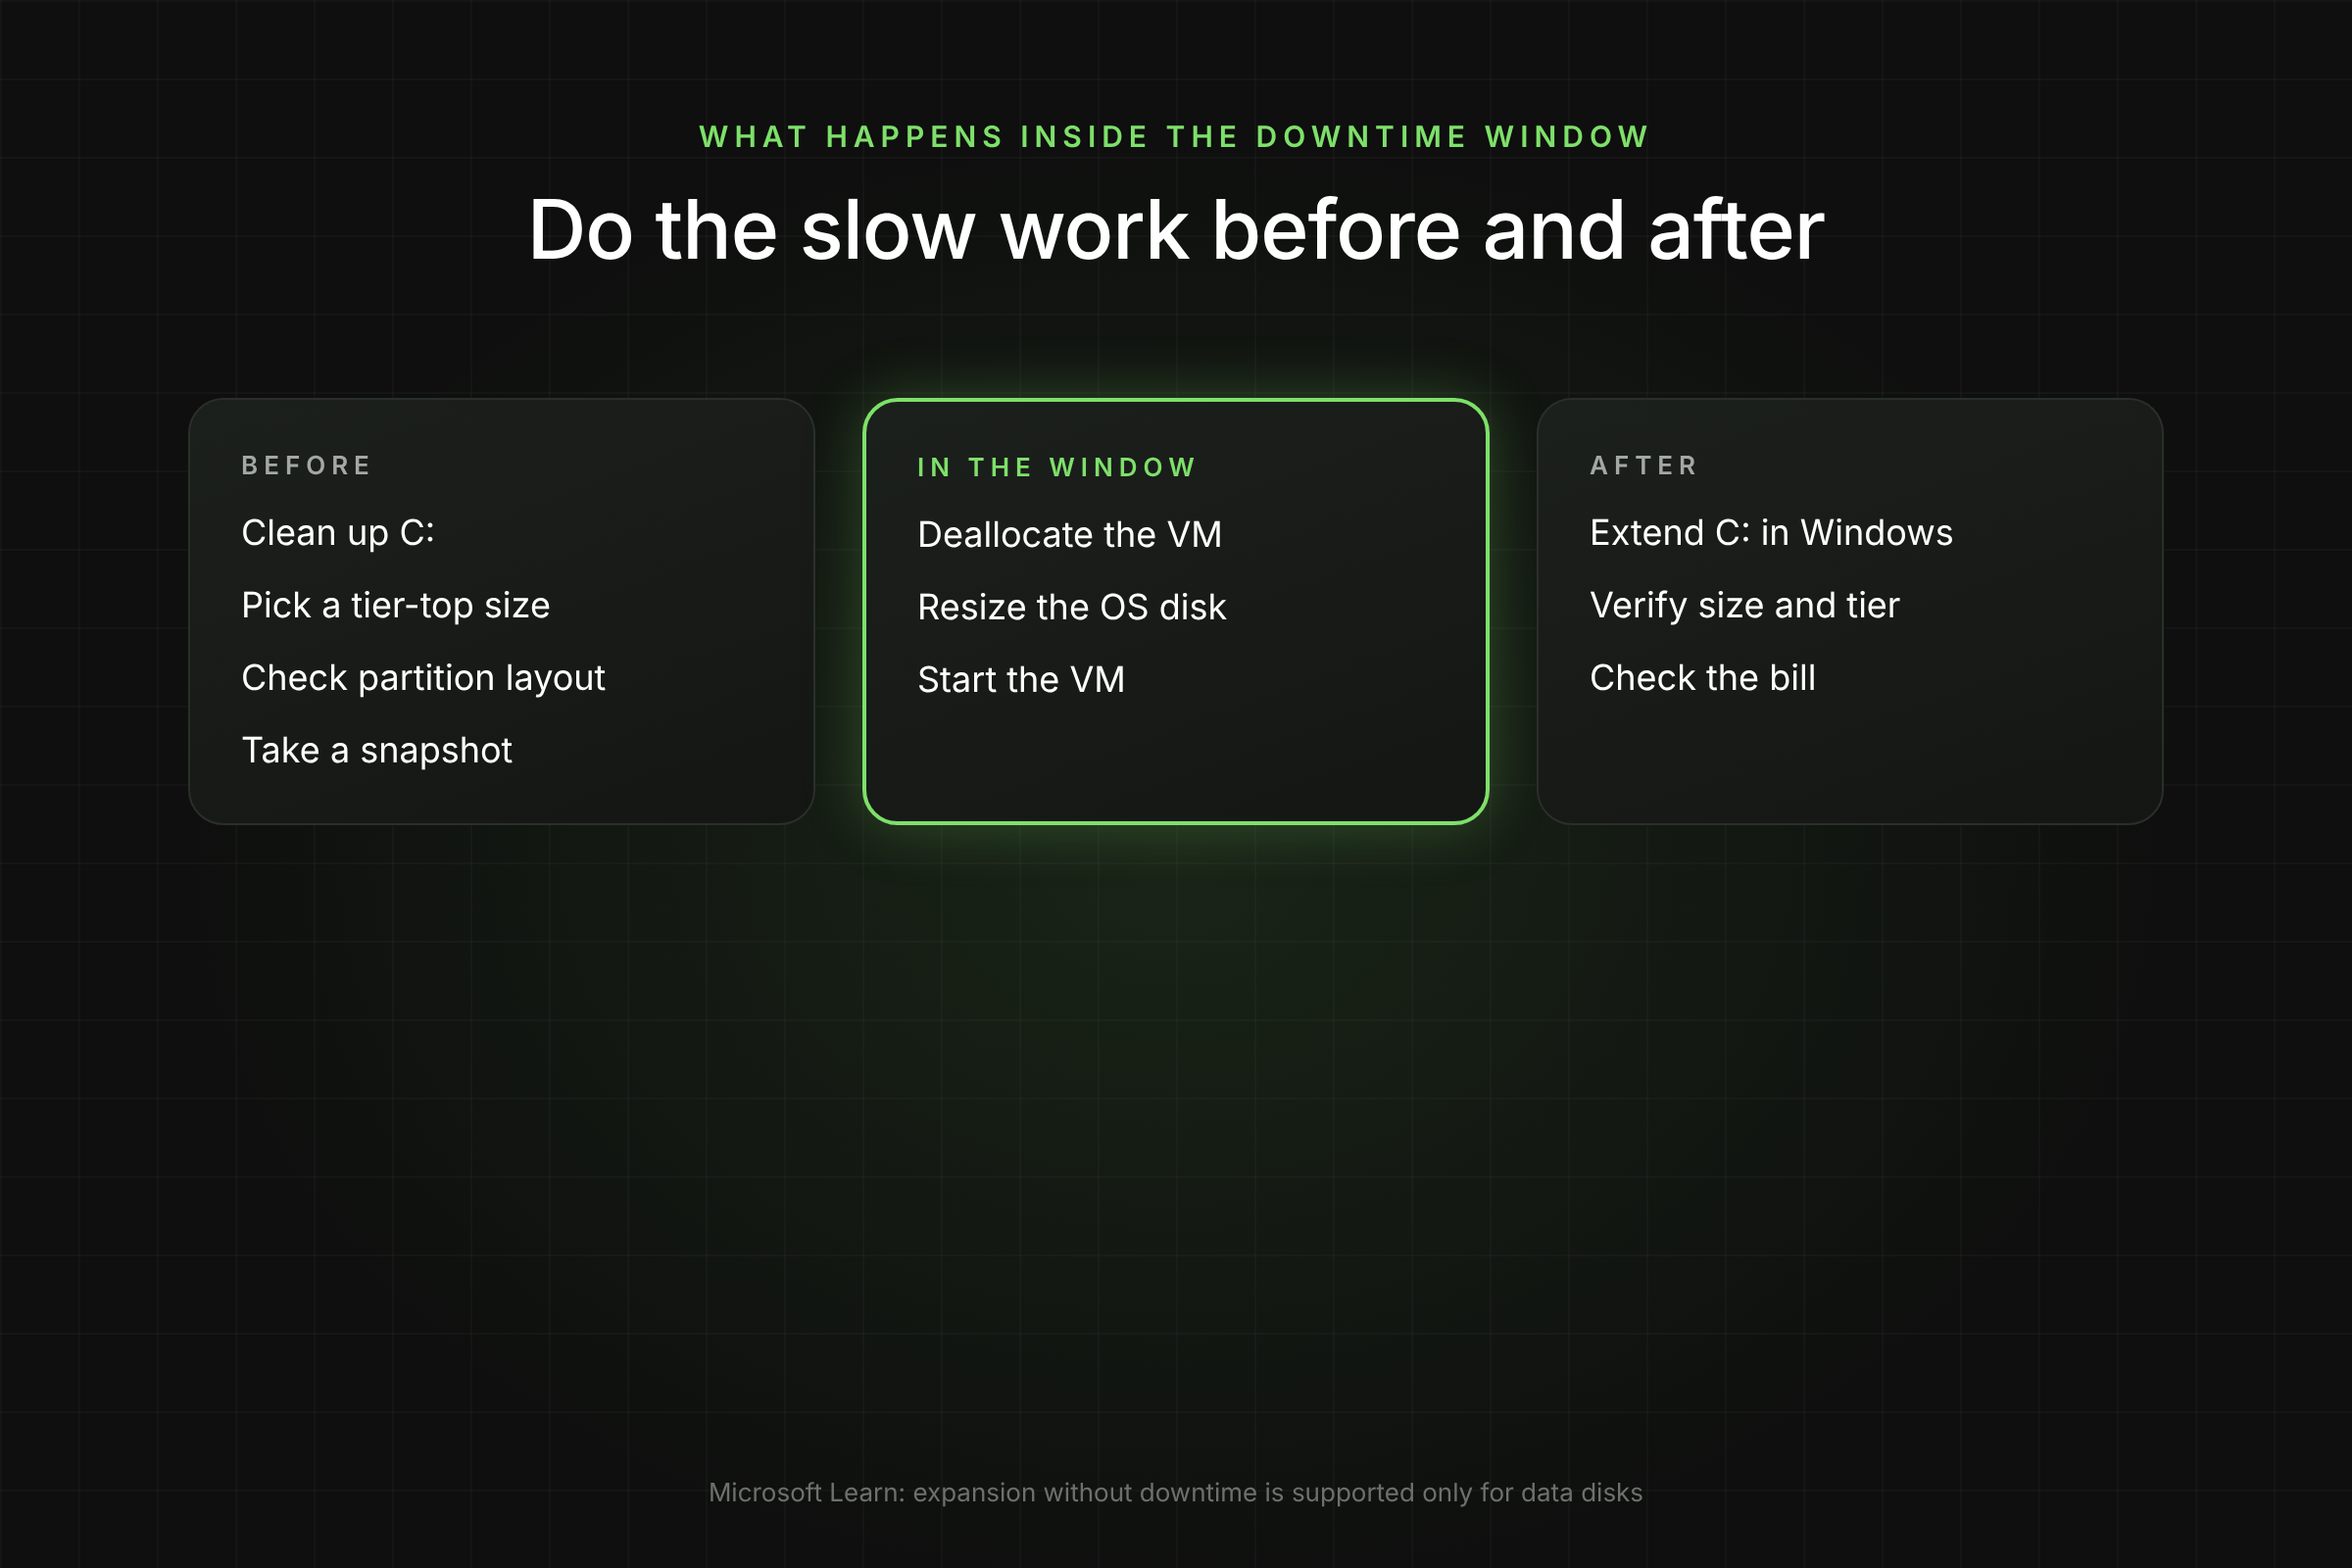
- The outage is the time to deallocate, resize and start the VM. Everything else, including the snapshot and the C: drive extension, happens outside the window.
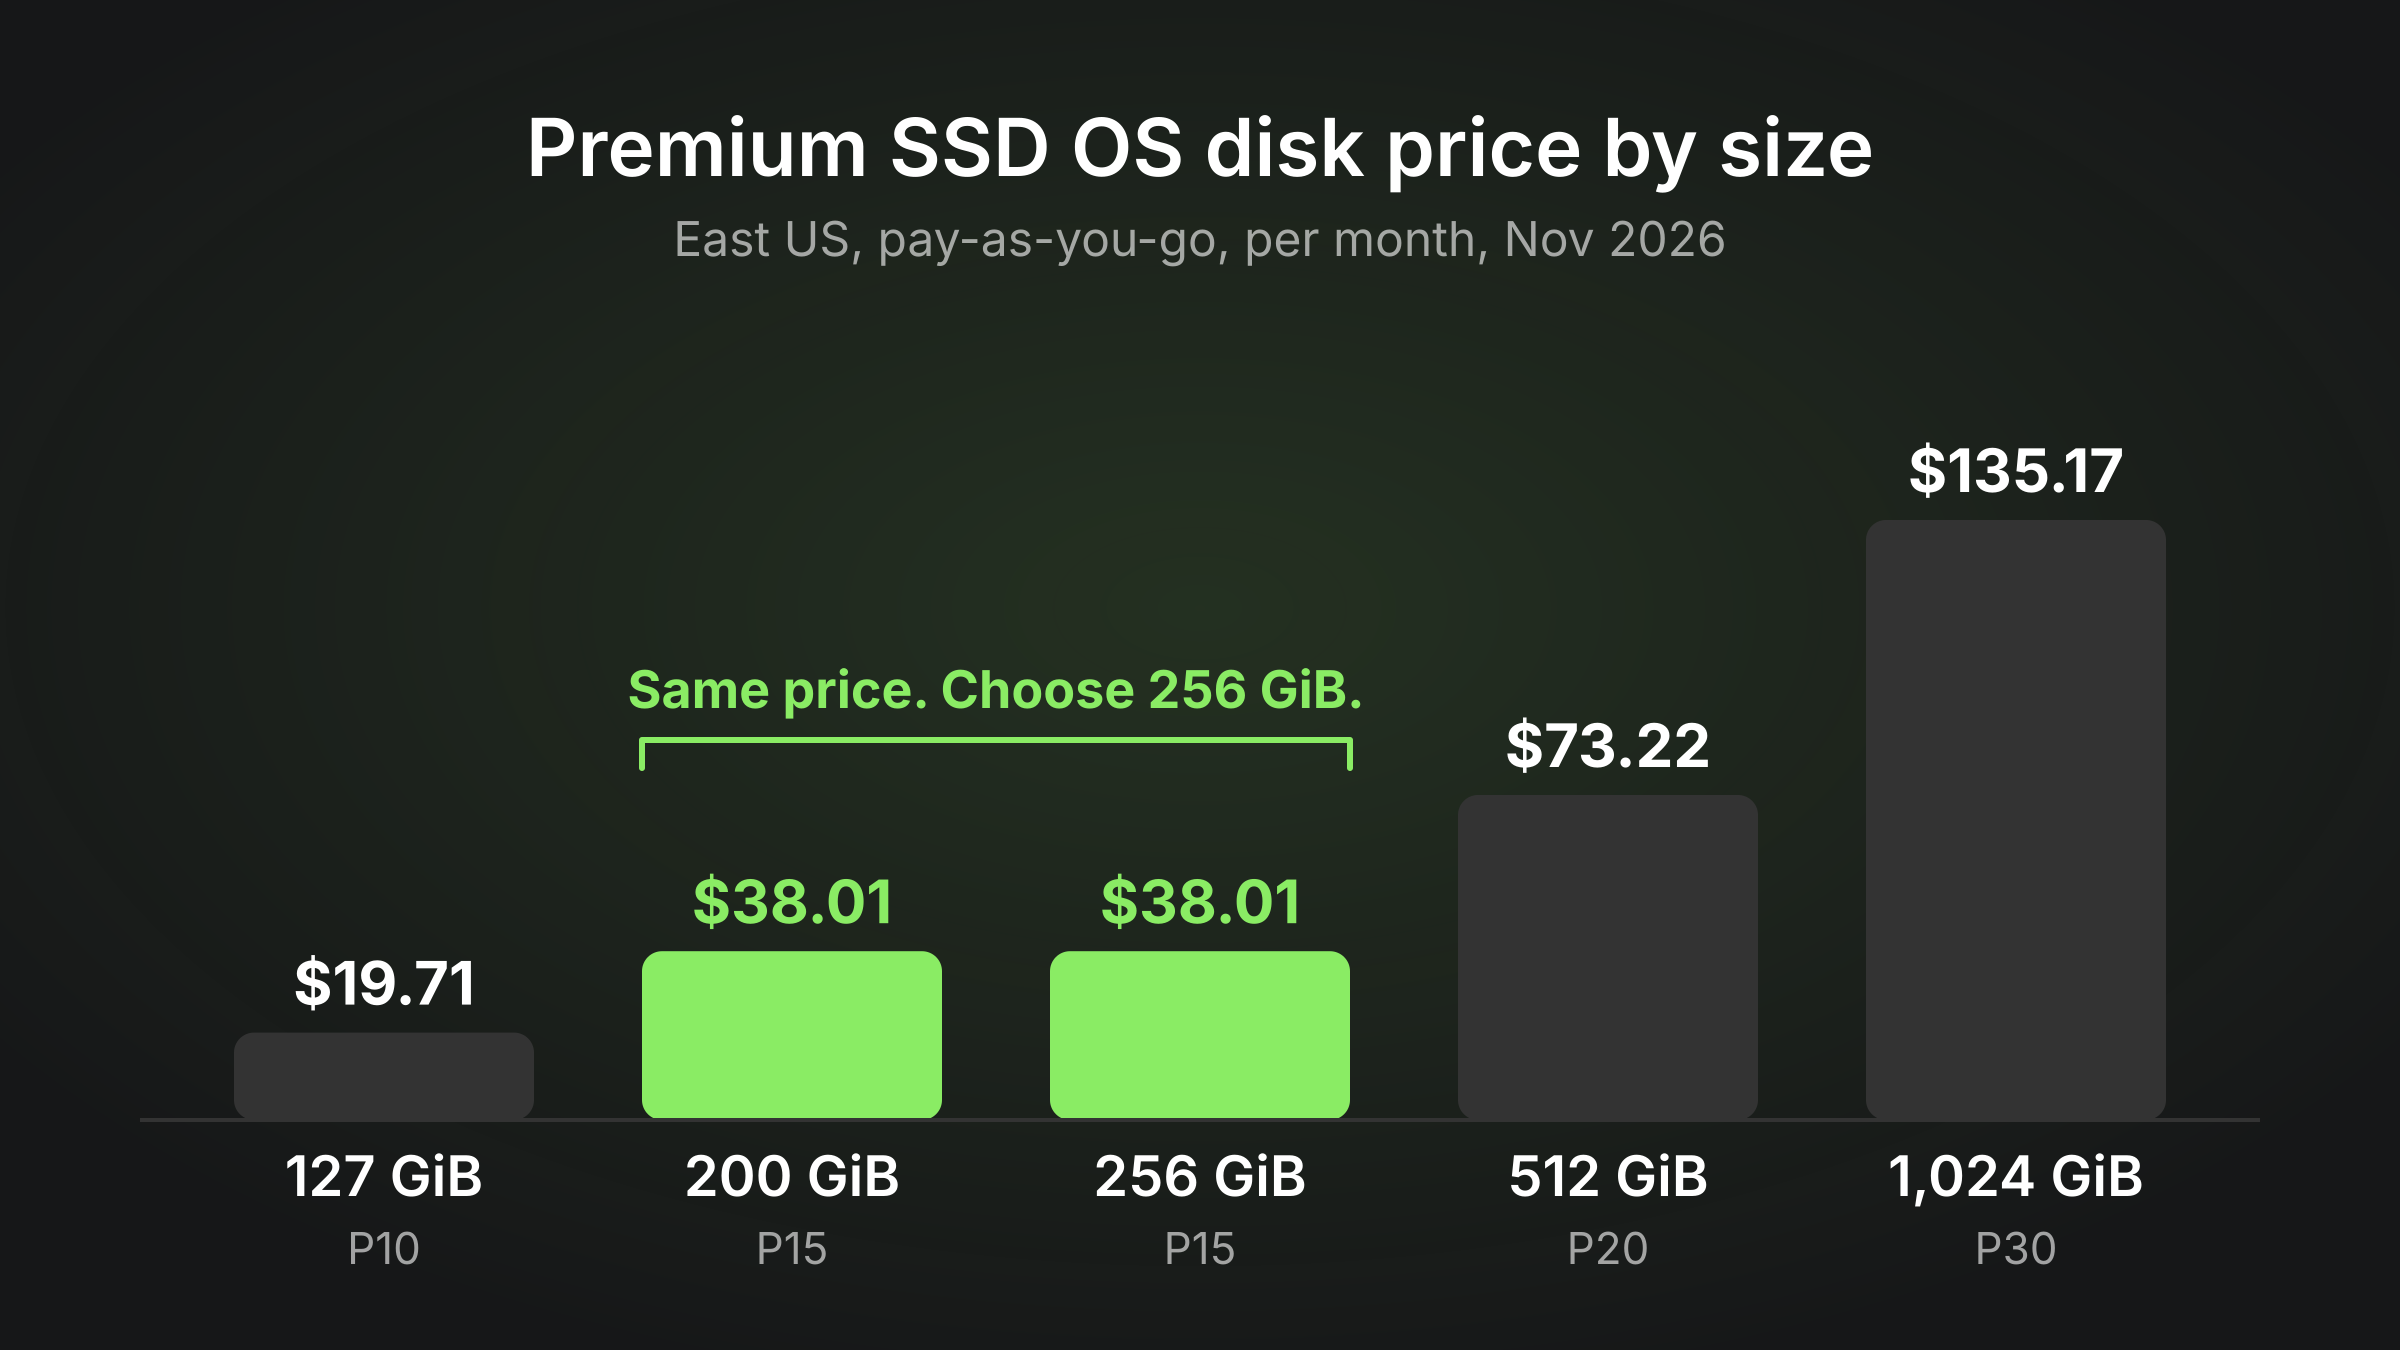
- Grow to the top of the next size tier, not to a random size. A 127 GiB Premium SSD OS disk grown to 200 GiB bills as P15 (256 GiB), $38.01 a month in East US, so you might as well take 256 GiB.
- You can't shrink the disk afterwards. The lasting fix is to keep growing data off the OS disk, on data disks that expand live.
Can You Extend an Azure Windows OS Disk without Downtime?
No. You can't extend an Azure Windows OS disk without deallocating the VM. Microsoft's expand-disks guide says expansion without downtime "is supported only for data disks," and that "OS disks and data disks that don't meet the requirements for expansion without downtime require deallocation" (Microsoft Learn, expand virtual hard disks on a Windows VM, updated 22 Sep 2026).
What you can control is how long the outage lasts and how risky it is. The disk resize itself is a metadata change. The downtime is mostly the VM stopping and starting. With the steps below prepared in advance, the window covers only three commands: deallocate, resize, start.
What are the OS Disk Limits?
An Azure OS disk can grow to 4,095 GiB. Microsoft states that "the maximum allowed is 4,095 GiB for OS disks."
Two more limits catch teams out:
- MBR partition style caps usable space at 2 TiB. If the OS disk uses MBR, Windows can't use anything past 2 TiB even if Azure allows it. You need to convert to GPT to use more.
- Shrinking isn't supported. Microsoft is explicit: "Shrinking an existing disk isn't supported and might result in data loss." Every GiB you add stays on the bill.
How Big are Windows OS disks by Default?
Most Windows Server Marketplace images create a 127 GiB OS disk. On Premium SSD, that lands in the P10 tier (128 GiB). The "smalldisk" image variants start at 30 GiB, which lands in P4 (32 GiB).
Because Premium SSD bills by tier, the size you pick matters more than it looks. We explain the tier rounding in how Azure managed disk billing works.
How do You Prepare before the Window?
Do all the slow and risky work before you stop the VM. The window should hold only the resize.
Do all the slow and risky work before you stop the VM. The window should hold only the resize.
- Find out what is filling C:. Before you buy space, check whether cleanup is enough. In an elevated prompt, clean the component store:
Dism.exe /Online /Cleanup-Image /StartComponentCleanup
Then check for large application logs, crash dumps and old installers. Often the real fix is moving them, not growing the disk.
- Pick the new size. Use the top of a Premium SSD tier: 256, 512 or 1,024 GiB. Anything in between bills as the next tier anyway.
- Check the partition style. In PowerShell: Get-Disk -Number 0 | Select-Object PartitionStyle. If it is MBR and you need more than 2 TiB, plan a GPT conversion separately.
- Check the partition layout. Run Get-Partition -DiskNumber 0. Windows can extend C: only into unallocated space directly after it. If a recovery partition sits right after C:, you have to deal with it before C: can grow.
- Take a snapshot. An incremental snapshot is your rollback.
az snapshot create -g <resource-group> -n <vm-name>-os-pre-resize \
--source <os-disk-id> --incremental true
- Note the IP and temp disk. If the VM has a dynamic public IP, deallocation releases it. Make it static first or update DNS afterwards. Anything on the temporary disk (usually D:) is lost on deallocation.
- Agree the window. Tell application owners. For VMs behind a load bala
How do you resize the OS disk with Azure CLI?
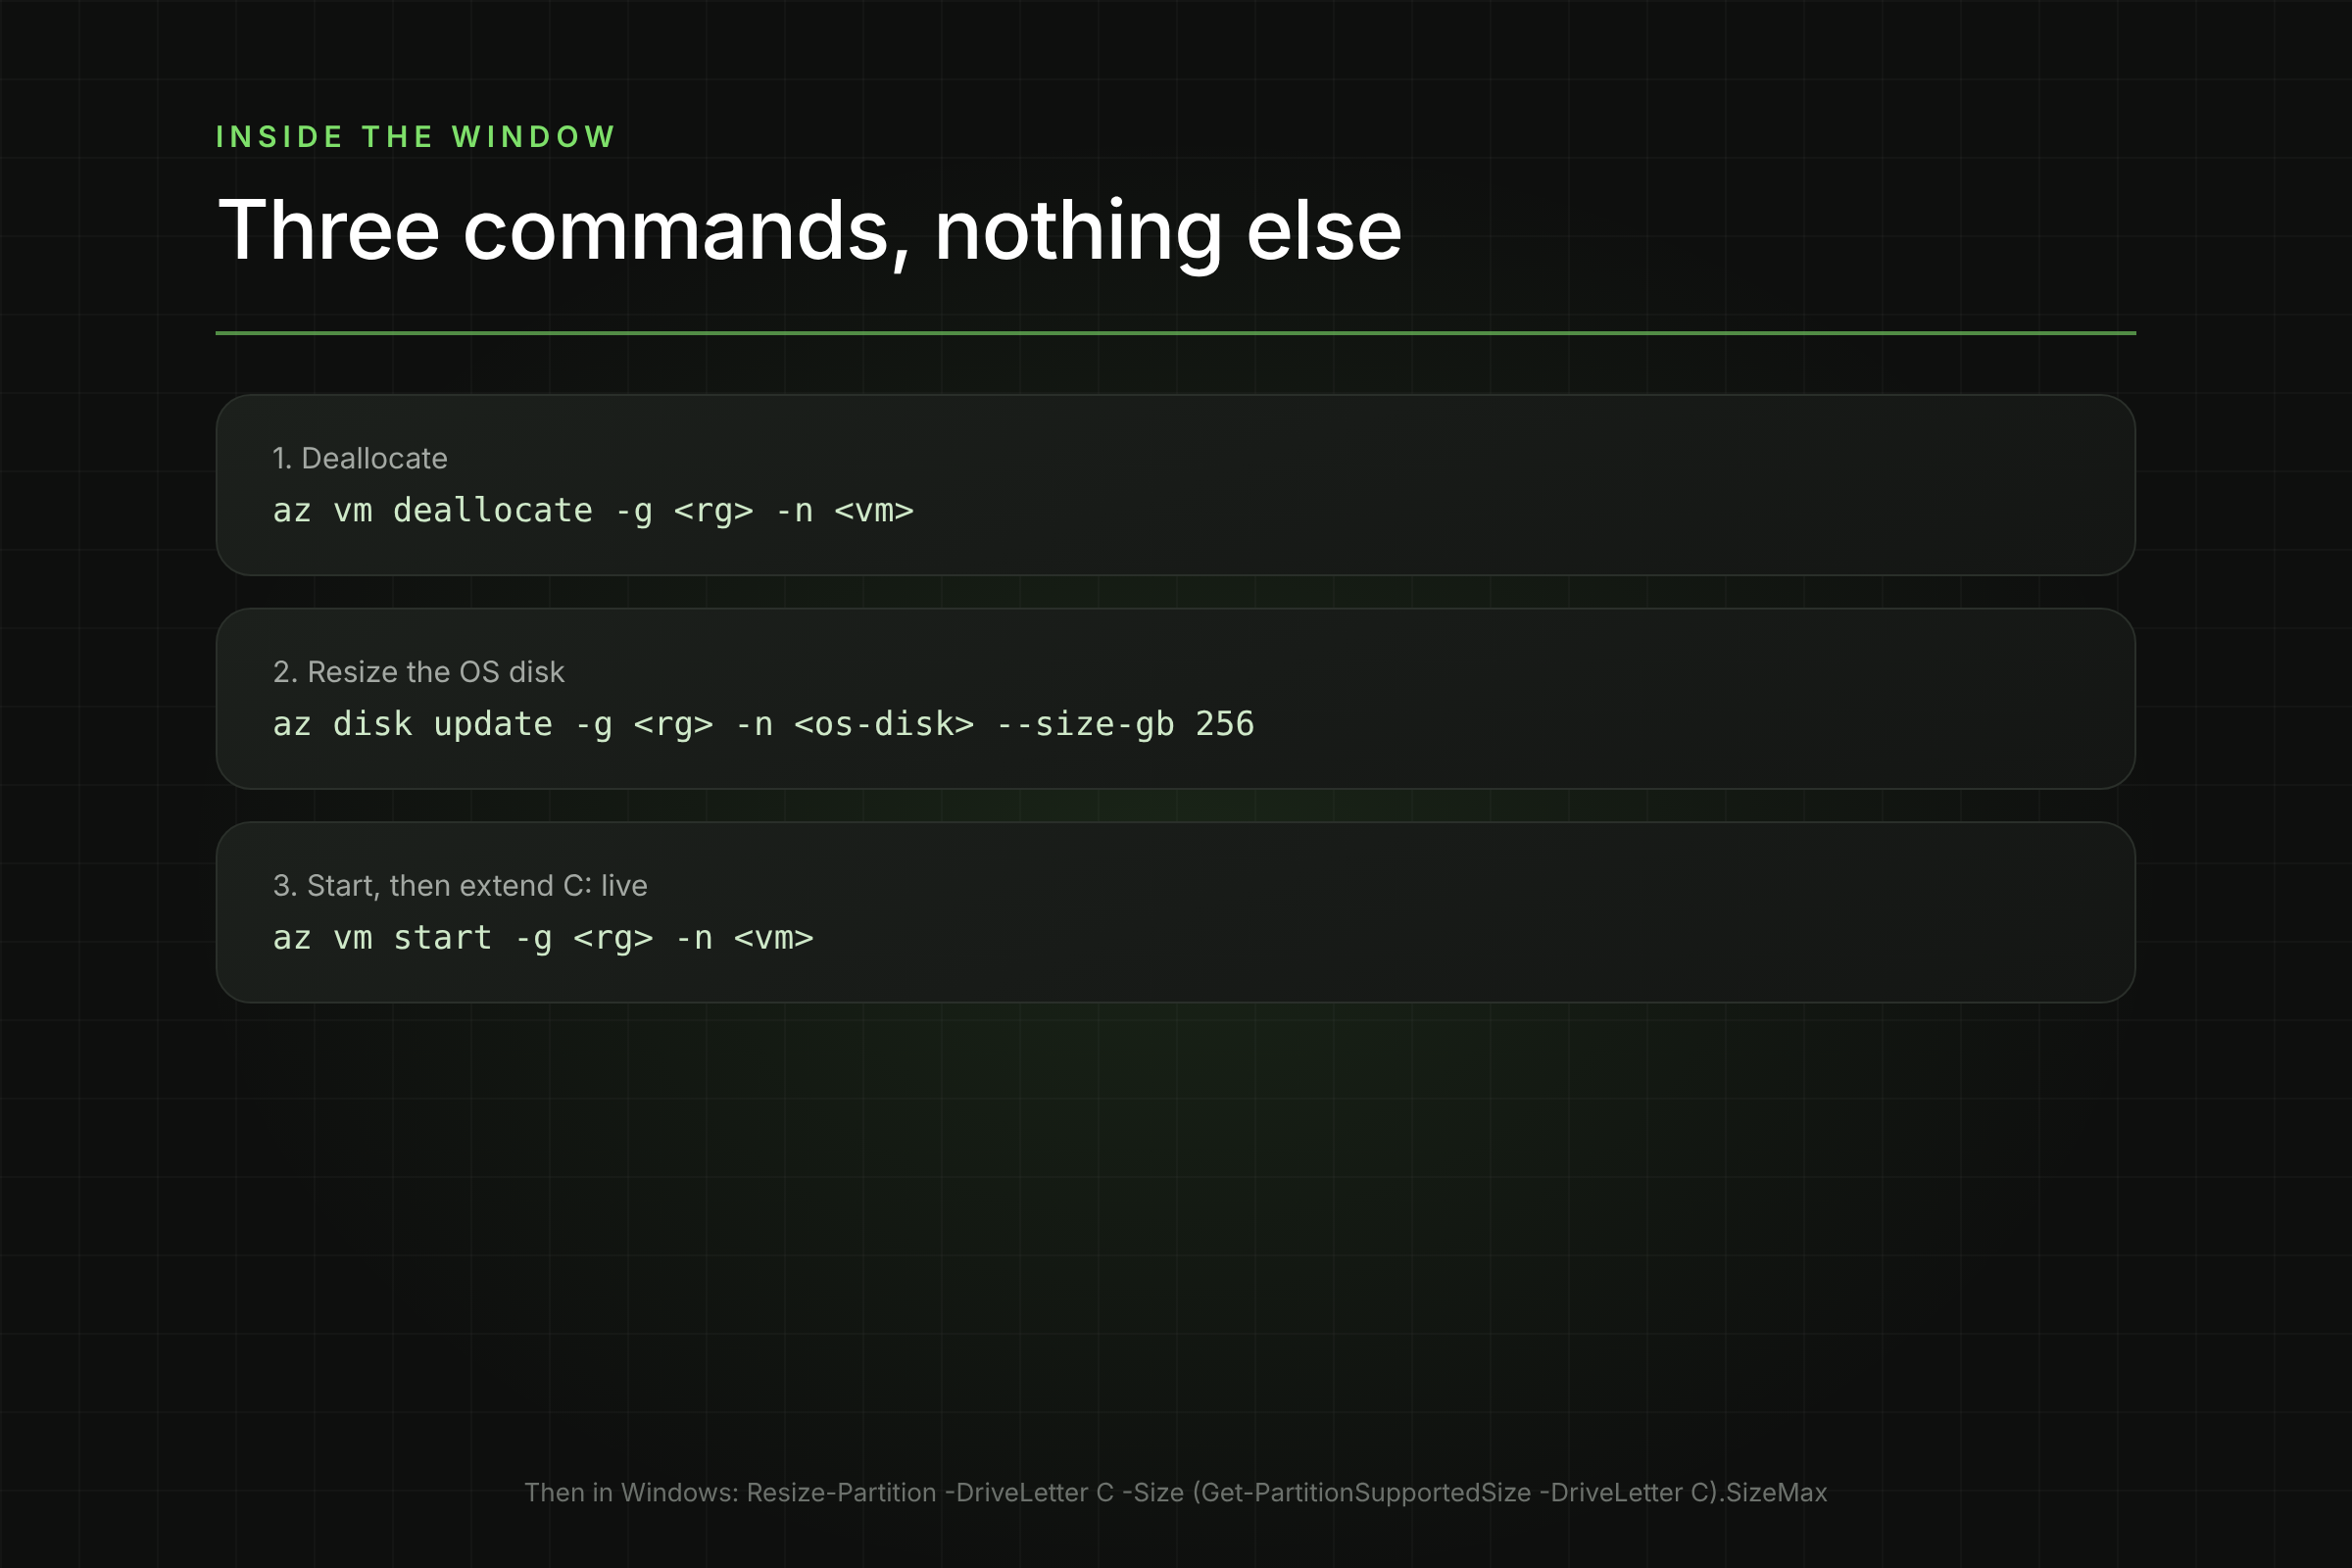
Three commands run inside the window. Get the OS disk name first, outside the window.
az vm show -g <resource-group> -n <vm-name> \
--query "storageProfile.osDisk.name" -o tsv
Inside the window:
- Deallocate the VM. A guest shutdown is not enough; it must be deallocated.
az vm deallocate -g <resource-group> -n <vm-name>
- Resize the OS disk.
az disk update -g <resource-group> -n <os-disk-name> --size-gb 256
- Start the VM.
az vm start -g <resource-group> -n <vm-name>
The window closes when the VM is back and the application health check passes. Extending the C: partition happens after, with the server already running.
The window closes when the VM is back and the application health check passes. Extending the C: partition happens after, with the server already running.
How do you resize it with PowerShell?
Microsoft's documented PowerShell flow does the same three steps.
$rgName = '<resource-group>'
$vmName = '<vm-name>'
$vm = Get-AzVM -ResourceGroupName $rgName -Name $vmName
Stop-AzVM -ResourceGroupName $rgName -Name $vmName
$disk = Get-AzDisk -ResourceGroupName $rgName -DiskName $vm.StorageProfile.OsDisk.Name
$disk.DiskSizeGB = 256
Update-AzDisk -ResourceGroupName $rgName -Disk $disk -DiskName $disk.Name
Start-AzVM -ResourceGroupName $rgName -Name $vmName
Stop-AzVM deallocates by default. Don't add -StayProvisioned, because a VM that is stopped but still provisioned can't have its OS disk resized.
Can you do it in the portal?
Yes. Stop the VM from the portal (this deallocates it). Open Disks, select the OS disk, go to Size + performance, choose the new size and save. Then start the VM.
How do you extend the C: drive in Windows?
Azure has made the disk bigger, but Windows has not used the new space yet. Extend the C: partition after the VM starts. This needs no restart.
PowerShell (recommended)
$max = (Get-PartitionSupportedSize -DriveLetter C).SizeMax
Resize-Partition -DriveLetter C -Size $max
Diskpart
diskpart
list volume
select volume <number of C:>
extend
Disk Management
Open Disk Management, right-click C:, select Extend Volume and accept the defaults.
If Extend Volume is greyed out, there is no unallocated space directly after C:. Check Get-Partition -DiskNumber 0 for a recovery partition between C: and the new space. Microsoft also notes that "you can't expand the size of striped volumes."
How do you verify the change?
Check three things: Azure, Windows and the bill.
- Azure. Confirm the new size and tier:
az disk show -g <resource-group> -n <os-disk-name> \
--query "{sizeGb:diskSizeGB, sku:sku.name, tier:tier}" -o table
- Windows. Confirm C: has the new capacity and free space:
Get-Volume -DriveLetter C | Select-Object Size, SizeRemaining
- Bill. In Cost Management, filter by the OS disk resource. The meter should change to the new tier, for example from P10 to P15, from the day of the change.
Keep the pre-resize snapshot until the application has run through a normal business cycle. Then delete it, because snapshots are billed too.
What does a bigger OS Disk Cost?
You pay the price of the Premium SSD tier the new size lands in. These are East US pay-as-you-go list prices for Premium SSD LRS, from the Azure Retail Prices API, Nov 2026.
Growing to 200 GiB and to 256 GiB costs the same, so choose 256.
What does it Cost Across a Fleet?
The per-disk number looks small. Across 200 Windows VMs grown from 127 GiB to 512 GiB "to be safe," the extra cost is 200 × ($73.22 for P20 − $19.71 for P10) = 200 × $53.51 = $10,702 a month, or $128,424 a year, and it can't be reversed. That is why you should size to measured need plus headroom, not to fear of the next ticket.
What are the gotchas?
- Deallocation, not shutdown. A shutdown from inside Windows leaves the VM provisioned. Azure won't resize the OS disk until the VM shows Stopped (deallocated).
- Dynamic public IPs are released on deallocation. Use a static IP or update DNS.
- Temp disk data is lost. Don't keep anything you need on the temporary disk (usually D:).
- MBR caps at 2 TiB. Check partition style before planning a large OS disk.
- Recovery partition blocks the extend. Windows extends only into space directly after C:.
- Encrypted disks. If the VM uses Azure Disk Encryption, check the current Microsoft guidance for resizing encrypted OS disks before you start, and keep the snapshot until you've verified the boot.
- No going back. Once grown, the OS disk stays that size. Size once, carefully.
How do you stop the OS disk filling up again?
Keep the OS disk for the OS. Put anything that grows on data disks, which you can expand live with no downtime.
Then watch free space on C: with an Azure Monitor alert at 80% used, so the next extension is planned, not an emergency.
Where does Lucidity Fit?
Once growth lives on data disks, Lucidity's AutoScaler module expands and shrinks those data disks live with no downtime, so you don't overprovision to stay safe. Want to see which disks are close to full or far too big? Switch on Free Insights for a read-only report of disk utilization across your Azure subscriptions.
Frequently Asked Questions
Can I extend the OS disk while the VM is running?
No. Azure supports expanding without downtime only for data disks. OS disks need the VM deallocated.
How long is the downtime?
It's the time Azure takes to deallocate the VM, apply the resize and start it again, plus your application's start-up time. The C: drive extension happens after the VM is running and needs no restart.
Why can't Windows extend C: into the new space?
Usually because a recovery partition sits directly after C:. Windows can extend a volume only into unallocated space next to it.
Can I shrink the OS disk back later?
No. Azure doesn't support shrinking managed disks. To get a smaller OS disk you would have to rebuild the VM on a new, smaller disk.
What is the maximum OS disk size?
4,095 GiB. Above 2 TiB, the disk must use GPT partitioning for Windows to use the space.
Table of Contents
Sign Up