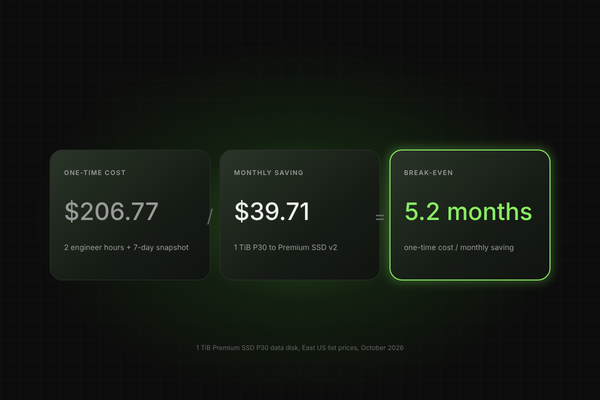
Break-even for changing an Azure disk type is the one-time cost of the change divided by the monthly saving. In our example, the one-time cost is $206.77: 2 engineering hours at an assumed $100 per hour, which is $200, plus a 7-day safety snapshot of $6.77. For a 1 TiB Premium SSD P30 data disk in East US:
Key Takeaways
- Break-even is simple: divide the one-time cost of the change by the monthly saving. In our example, the one-time cost is $206.77 (2 engineering hours at an assumed $100 an hour, plus a 7-day safety snapshot).
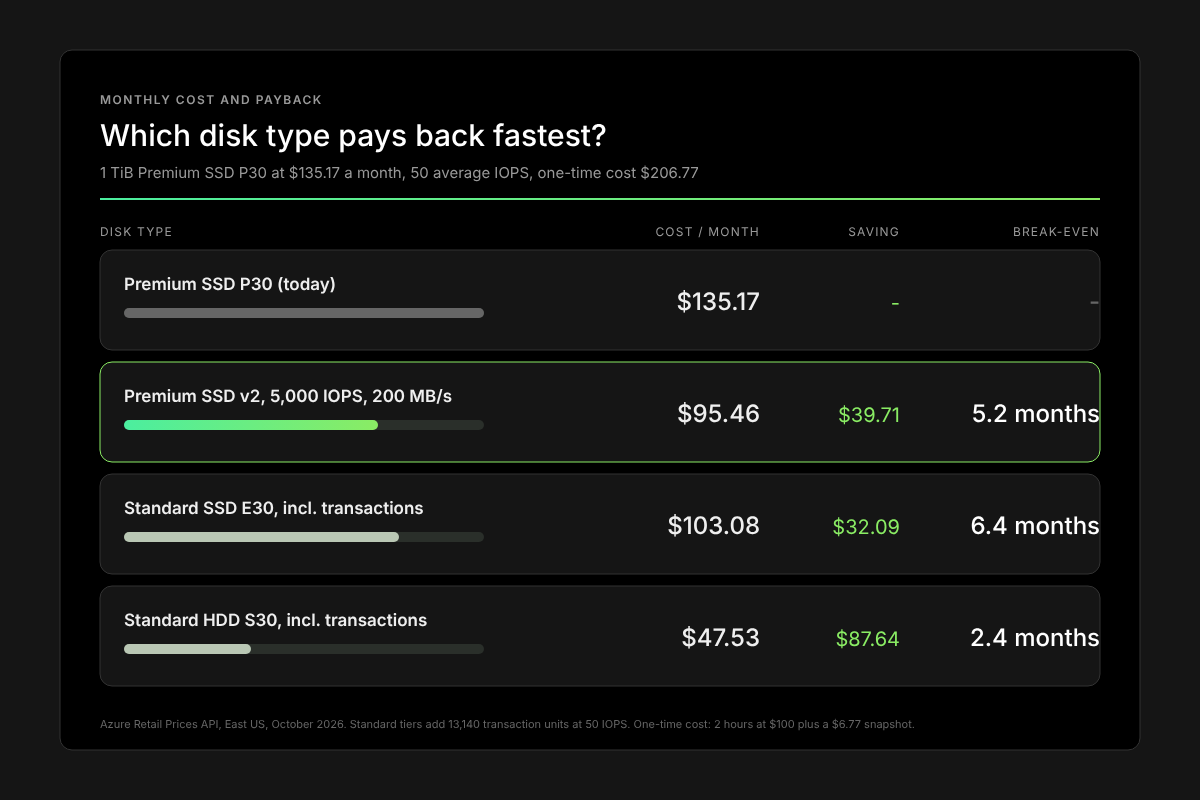
- Premium SSD v2 pays back in about 5.2 months for a 1 TiB P30 in East US. It saves $39.71 a month at the same performance, or $52.94 a month at the free baseline of 3,000 IOPS and 125 MB/s.
- Standard SSD E30 pays back in about 6.4 months at 50 average IOPS. The saving disappears at about 111 average IOPS, because Standard SSD bills every transaction.
- Standard HDD S30 pays back fastest, in about 2.4 months, but it is the lowest performance class and not suited to latency-sensitive data.
- Target Premium SSD data disks with low measured IOPS. Check 30 days of average and peak IOPS in Azure Monitor before you decide.
- Plan for downtime and exit costs. Every disk type change needs a maintenance window. A Premium SSD v2 disk can’t switch directly back to another type, so moving back needs a snapshot and a new disk
Which change is this guide about?
This guide covers one operation: changing the disk type (SKU) of a managed disk while keeping its size. Azure has three operations that get confused, and they behave very differently.
Microsoft states that "shrinking an existing disk isn't supported and might result in data loss" (Microsoft Learn). A smaller disk means creating a new disk and copying the data across.
Step 1: Which disks are worth changing?
Start with disks billed for performance they do not use. These are usually Premium SSD data disks with low measured IOPS and throughput, and P-series disks whose real IOPS fit inside the free Premium SSD v2 baseline of 3,000 IOPS and 125 MB/s.
Pull 30 days of Data Disk IOPS Consumed Percentage and average IOPS per disk from Azure Monitor. You need average IOPS for the Standard SSD maths and peak IOPS to check if the new disk can keep up.
To see this across every subscription at once, switch on Free Insights for a read-only report of disk utilisation and savings across your Azure subscriptions. It lists which Premium SSD disks run far below their provisioned performance, so you can use real utilisation in the formula below instead of estimates.
Step 2: What does the change cost once?
The one-time cost is the work and safety net needed to make the change. In this example it is $206.77:
- Engineering time: $200. 2 hours at an assumed $100 per hour to snapshot, deallocate, convert, restart and check the disk. Use your own team's rate.
- Safety snapshot: $6.77. An incremental snapshot of 600 GiB used data, kept 7 of 31 days at $0.05 per GB-month, as a rollback point. The first incremental snapshot is a full copy billed on used size (Microsoft Learn).
- Downtime. Plan a short maintenance window, because conversion requires a VM restart (Microsoft Learn). If downtime has a business cost, add it here.
Step 3: What does each option save each month?
Compare each option against a 1 TiB P30 at $135.17 a month. Transaction costs assume 50 average IOPS.
How the numbers are built (East US list prices, Azure Retail Prices API, Oct 2026):
- Premium SSD v2: 1,024 GiB x $0.0803 = $82.23, plus 2,000 IOPS above the free 3,000 at $0.00511 each, which is $10.22, plus 75 MB/s above the free 125 at $0.0402 each, which is $3.02.
- Standard SSD: 50 IOPS x 730 hours is 131.4 million operations, or 13,140 billing units of 10,000, at $0.002 each = $26.28.
- Standard HDD: the same 13,140 units at $0.0005 each = $6.57.
Step 4: How long until the change pays back?
Break-even months = one-time cost / monthly saving.
The Standard SSD ceiling. Without the hourly cap, E30 transactions erase the full $58.37 capacity saving at about 111 average IOPS. Microsoft applies an hourly limit on billable Standard SSD transactions, but the disk types page does not state the value, so measure before you rely on it.
Step 5: How do you change the disk type with Azure CLI?
The built-in Virtual Machine Contributor role covers disk writes and VM deallocation; snapshot creation needs Microsoft.Compute/snapshots/write (Azure built-in roles).
1. Take an incremental snapshot as a rollback point.
diskId=$(az disk show --resource-group $rg --name $diskName --query id -o tsv)
az snapshot create -g $rg -n $snapName --source $diskId --incremental true
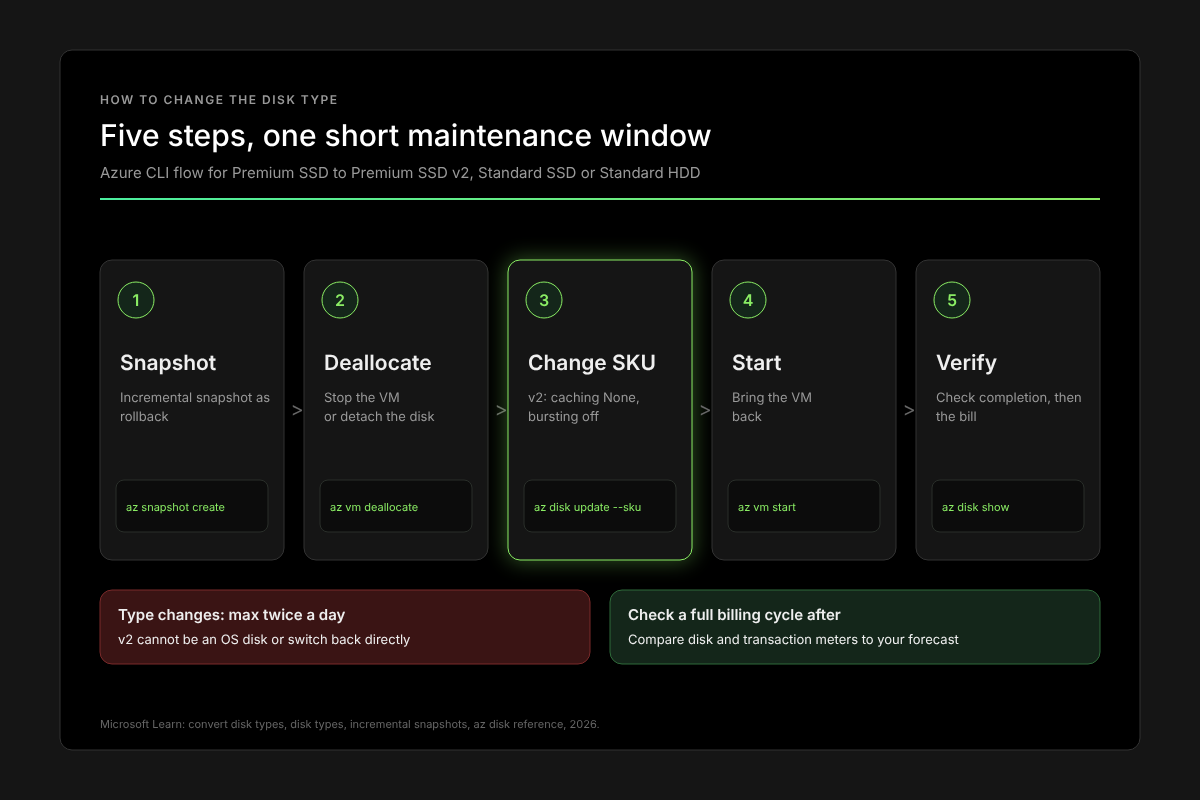
2. To move to Standard SSD or Standard HDD, deallocate the VM, change the SKU, then start the VM.
vmId=$(az disk show --resource-group $rg --name $diskName --query managedBy -o tsv)
az vm deallocate --ids $vmId
az disk update --resource-group $rg --name $diskName --sku StandardSSD_LRS
az vm start --ids $vmId
Use --sku Standard_LRS for Standard HDD.
3. To move to Premium SSD v2, deallocate the VM, set host caching to None, disable bursting, convert, then set the IOPS and MB/s you need.
az vm deallocate --ids $vmId
az vm update -g $rg -n $vmName --disk-caching $lun=None
az disk update --resource-group $rg --name $diskName --enable-bursting false
az disk update --resource-group $rg --name $diskName --sku PremiumV2_LRS
az disk update --resource-group $rg --name $diskName --disk-iops-read-write 5000 --disk-mbps-read-write 200
az vm start --ids $vmId
az disk show --resource-group $rg --name $diskName --query [completionPercent] -o tsv
In the portal, stop the VM, open Virtual machines, select the VM, then Disks, select the disk, open Size + performance, change Account type, and select Save (Microsoft Learn).
What gotchas change the maths?
- Disk type can change only twice per day (Microsoft Learn).
- Premium SSD v2 cannot be an OS disk, does not support host caching, and in most zonal regions attaches only to zonal VMs (Microsoft Learn).
- Disks created from an Azure Compute Gallery image cannot move to Premium SSD v2.
- Shared disks must be detached from all VMs, and Azure Site Recovery disabled, before moving to Premium SSD v2.
- You cannot switch a Premium SSD v2 directly to another type; leaving it needs a snapshot and a new disk. Count that exit path in your risk.
- Standard SSD counts each I/O up to 256 KiB as one transaction; larger I/Os count as several.
How do you verify the change worked?
Run az disk show --resource-group $rg --name $diskName --query "{sku:sku.name}" -o table to confirm the new type. For Premium SSD v2, wait until completionPercent reaches 100, because performance is degraded until then.
Then compare a full billing cycle against your forecast. In Azure Monitor, check IOPS and throughput stay inside the new limits. In Cost Management, check the disk and transaction meters match the inputs you used in Step 3. Our Azure disk right-sizing guide covers which metrics to review.
Frequently Asked Questions
Is Standard SSD always cheaper than Premium SSD?
No. Standard SSD is cheaper only while transaction charges stay below the capacity saving. An E30 saves $58.37 a month against a P30 before transactions, and about 111 average IOPS uses up that saving. Measure average and peak IOPS first.
Do I need to deallocate the VM to convert to Premium SSD v2?
Yes. Conversion requires a VM restart, so schedule a maintenance window. Before converting, set host caching to None, disable bursting and detach shared disks. Performance stays degraded until completionPercent reaches 100.
Can I move a Premium SSD v2 disk back to Premium SSD?
Not directly. You need an incremental snapshot and a new disk created from it. That adds snapshot cost, a new disk resource and a reattach step to your rollback plan.
Can I make a disk smaller instead of changing its type?
Not in place. Azure does not support shrinking a managed disk. You have to create a smaller disk and copy the data, which is a separate project from a
Table of Contents
Sign Up